

Smart money concepts are a framework for understanding how banks, hedge funds, and large institutions move price. The core idea is simple: price does not move randomly. It moves to collect liquidity sitting at predictable retail levels, fill institutional orders, and then deliver price to the next target. Everything you see on a chart has a reason behind it, and smart money concepts give you the tools to read that reason before the move happens.
What Smart Money Concepts Actually Explain
Most retail traders lose money not because they lack discipline but because they are using tools designed to describe what already happened. Indicators like RSI, MACD, and moving averages tell you about the past. Smart money concepts, on the other hand, focus on the mechanics behind price delivery. Instead of asking whether price broke above resistance, you ask why it moved there, whose orders were triggered, and where it is heading next.
That shift in thinking is what makes SMC different from conventional technical analysis. The result is not just a new set of tools. It is a completely different way of reading the market.
Order Flow: The Direction Institutions Are Positioned
The first thing you need to establish before any trade is order flow. Order flow tells you which direction the institution is currently positioned. When institutions are net long, the order flow is bullish and price makes higher highs and higher lows. When they are net short, the order flow is bearish and price makes lower highs and lower lows.
Order flow trading within the SMC framework is not about reading tape data. You determine it from market structure on the chart in front of you. When price breaks the structure of an existing flow, an order flow shift has occurred. That shift signals that institutional positioning has changed and your bias needs to change with it.
This matters because every entry you take should align with the order flow on the timeframe above your entry timeframe. Trading a bearish order block inside a bullish order flow is a low-probability bet. Trading that same bearish order block inside a bearish order flow is a completely different trade. The complete guide to institutional order flow at GhostTraders walks through how to identify these shifts and use them to build your directional bias from the top down.
Liquidity: What Institutions Are Hunting on Every Chart
Institutions cannot fill large orders at the current market price without moving price against themselves. They need the other side of the trade to come to them, and retail stop losses provide exactly that. When enough traders place stops at the same level, that level becomes a target, not a barrier.
Buy Side Liquidity and Sell Side Liquidity
Buy side liquidity (BSL) sits above previous highs. Short sellers place stops there, and breakout buyers stack pending orders there. When institutions need to sell at scale, they drive price into that BSL, trigger all those orders, and use them to fill short positions. The result looks like a breakout to a retail trader. In reality it is a sell entry for the institution.
Sell side liquidity (SSL) sits below previous lows for the same reason in reverse. Long traders have stops there, and breakout sellers have pending orders there. When institutions need to buy at scale, they sweep below the low, collect the SSL, and reverse price upward. That is not a stop hunt you need to fear. It is a signal you can trade.
The most reliable SSL and BSL levels form at previous day highs and lows, previous week highs and lows, equal highs and equal lows where stops have piled up repeatedly, and at the extremes of consolidation ranges. The liquidity-based bias guide at GhostTraders goes deeper on how to identify these pools and use them to determine which direction the market is moving before it moves there.
Order Blocks: Where Institutions Leave Their Footprints
An order block is the last candle or small cluster of candles before a strong impulsive move. That zone is where the institution placed its orders before price moved sharply in one direction. Because not all of those orders filled in the initial move, institutions return price to that zone later to fill the remainder.
A bullish order block is typically the last bearish candle before a strong bullish impulse. A bearish order block is typically the last bullish candle before a strong bearish impulse. When price returns to these zones, they represent high-probability entry points because you are positioning yourself where institutional orders are still resting.
The important distinction between order blocks and retail support and resistance is that retail levels are drawn by retail traders and are therefore known and exploited by institutions. Order blocks are drawn based on where the institution actually entered, which makes them structurally more reliable. That said, context is everything. A bullish order block in a bearish order flow with no confluence is a low-probability setup. The same order block sitting below a fresh fair value gap, after a completed liquidity sweep, in a bullish order flow, is one of the best entries smart money concepts produce. The complete order block guide at GhostTraders covers how to identify valid blocks, discard mitigated ones, and structure entries around them correctly.
Fair Value Gaps: Imbalances Price Is Drawn Back To
A fair value gap (FVG) forms when price moves so aggressively in one direction that it skips over a price range entirely, leaving a gap where no two-sided trading occurred. That inefficiency is what price is drawn back to fill before continuing.
In practice, an FVG appears across three consecutive candles. For a bullish gap, the third candle’s low does not overlap with the first candle’s high. For a bearish gap, the third candle’s high does not overlap with the first candle’s low. The space between those two wicks is the fair value gap.
Within smart money concepts, fair value gaps represent internal range liquidity. After institutions sweep external liquidity at a swing high or low, price rebalances toward an internal FVG before the next leg begins. That rebalance is your entry. You wait for price to retrace into the gap rather than chasing the initial move, and your stop sits beyond the extreme of the sweep that preceded it. The fair value gap trading strategy guide at GhostTraders covers exactly how to identify valid gaps, distinguish high-probability ones from low-probability ones, and combine them with the rest of the SMC framework.
External and Internal Range Liquidity: The Cycle Behind Every Move
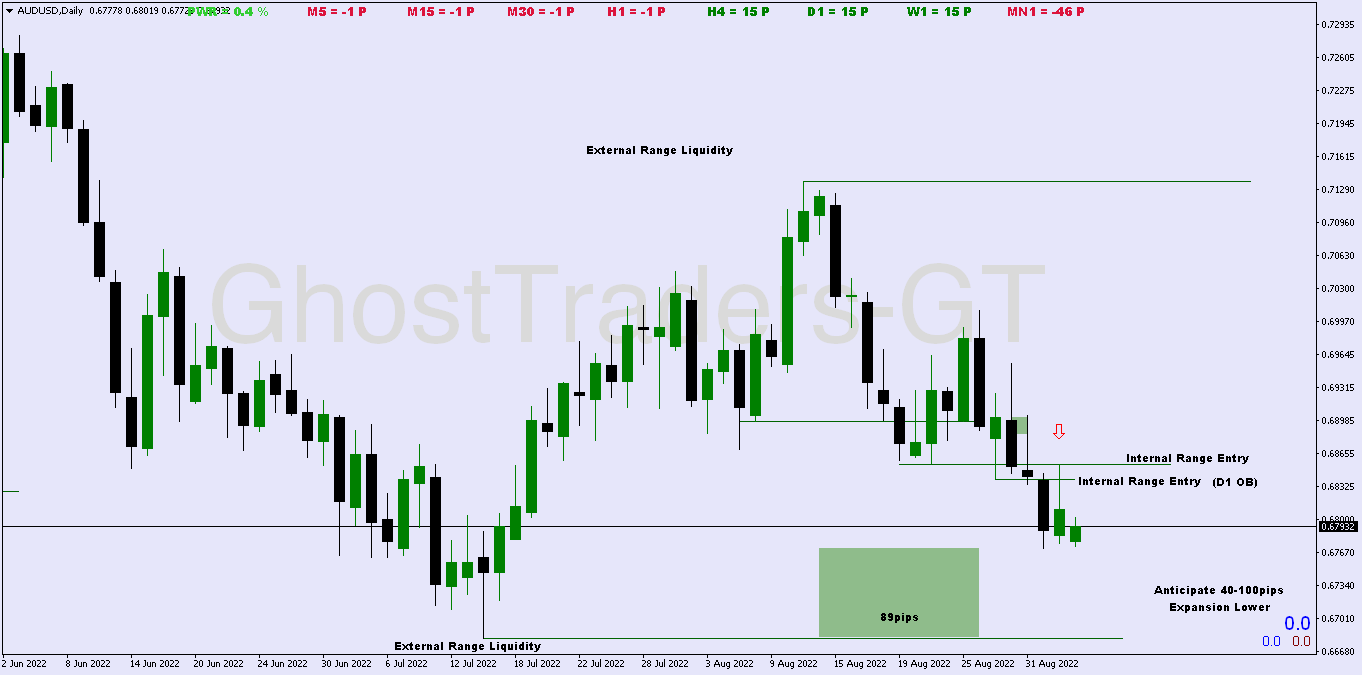
External Range Liquidity (ERL) is the liquidity sitting outside a defined price range. Specifically, it sits at previous swing highs above and previous swing lows below. This is where BSL and SSL accumulate and where price goes when it is making a directional move to hunt stops and collect institutional orders.
Internal Range Liquidity (IRL) is the liquidity sitting inside the range. It consists of fair value gaps, order blocks, and volume imbalances that price rebalances toward after it has completed a sweep of external liquidity.
The cycle between these two is what drives most price movement. Price sweeps ERL at a swing low, taking SSL, then reverses and draws toward an internal fair value gap. Once that gap is filled, price moves toward the next external target, the swing high above where BSL sits. When that BSL is swept, the cycle repeats. This constant rotation from ERL to IRL to ERL again is the engine behind every significant chart move across every timeframe. The dedicated External and Internal Range Liquidity guide at GhostTraders breaks down how to define your ranges and trade this cycle in real time.
The PD Array Matrix: How to Rank What You Are Looking At
Within smart money concepts, not every tool carries equal weight. The Premium and Discount Array Matrix ranks the various institutional reference points from most to least significant so you know which ones to prioritise when multiple tools appear at the same price level.
The matrix includes order blocks, fair value gaps, breaker blocks, mitigation blocks, rejection blocks, and propulsion blocks among others. Each tool carries different weight depending on the context in which it formed. An order block at an external range liquidity level that also coincides with a fair value gap is a substantially stronger signal than an order block standing alone with no additional confluence. Learning how to stack these tools and read that hierarchy is what separates consistent SMC traders from those who apply the concepts mechanically without understanding which signals carry the most weight. The Forex PD Array Matrix guide at GhostTraders walks through each tool, explains the ranking, and shows how to use the hierarchy to identify the highest-probability zones on any chart.
A Complete Smart Money Concepts Trade Framework
Understanding each SMC tool individually is a starting point. The real edge comes from combining them into a coherent process you can apply consistently.
Step 1: Establish Higher Timeframe Bias
Start on the daily or 4-hour chart. Identify whether order flow is bullish or bearish. Mark the most significant BSL and SSL levels. Determine where price is in the ERL to IRL cycle. This is your context for the session.
Step 2: Identify the Next Draw on Liquidity
Based on that context, determine what price is heading toward. If ERL was just swept at a swing low, the draw is toward IRL inside the range. If IRL has been tapped, the draw is toward the next ERL at the opposing swing high. Know this before you look for entries.
Step 3: Wait for a Liquidity Sweep on the Lower Timeframe
Drop to the 1-hour or 15-minute chart. Wait for price to sweep the BSL or SSL that aligns with your higher timeframe bias. After an SSL sweep when bias is bullish, you are looking for a bullish reversal. After a BSL sweep when bias is bearish, you are looking for a bearish reversal.
Step 4: Confirm the Change of Character
Once the sweep occurs, wait for a Change of Character (CHoCH) on the lower timeframe. This is the first break of market structure in the new direction. Without the CHoCH, the reversal is unconfirmed and the trade does not exist yet.
Step 5: Enter at the Fair Value Gap or Order Block
Once the CHoCH confirms, identify the fair value gap or order block created during the sweep move. That is your internal range liquidity entry zone. Set a limit order at the gap, or at the 50% midpoint known as the Consequent Encroachment level, and wait for price to retrace into it.
Step 6: Define Your Stop and Target
Place your stop loss beyond the extreme of the sweep. For a long after an SSL sweep, the stop goes below the swept low. For a short after a BSL sweep, the stop goes above the swept high. Your primary target is the opposing liquidity level at the other end of the range.
This framework applies on any timeframe. The same logic that works on a 15-minute chart for intraday setups works on a 4-hour chart for swing trades because the institutional mechanics do not change with timeframe.
Common Mistakes in Applying Smart Money Concepts
Applying SMC tools without establishing bias first is the most expensive error. Using an order block or FVG entry without knowing whether the higher timeframe order flow supports the direction is guessing with extra steps. Always build your bias before you look for entries.
Trading every liquidity sweep as a reversal is another common mistake. Not every sweep produces a reversal. Sometimes price sweeps a level and continues through it, which means acceptance not rejection. The CHoCH on a lower timeframe is what separates one from the other.
Entering mitigated order blocks is a reliable way to stack losing trades. An order block that price has already visited once has already served its purpose. The unfilled orders that made it significant are gone. Only trade fresh, unmitigated blocks.
Ignoring where price is in the ERL to IRL cycle often puts traders in opposition to the dominant draw. If price is still heading toward ERL, entering a trade in the direction of an IRL draw can be premature. Know the cycle and trade with it.
Frequently Asked Questions
What is the difference between smart money concepts and ICT?
ICT (Inner Circle Trader) is the most widely cited source for many of the concepts within the SMC framework, including fair value gaps, order blocks, kill zones, and the PD array matrix. Smart money concepts is a broader term that encompasses ICT methodology alongside other institutional trading frameworks. At GhostTraders, the approach focuses on the core mechanics of how institutions operate rather than any single educator’s branding.
Are smart money concepts suitable for beginners?
Yes, but they require learning in the right sequence. The concepts build on each other, so trying to trade order blocks before you understand order flow will produce inconsistent results. Start with market structure and order flow, then add liquidity concepts, then order blocks and fair value gaps. Building the framework in order makes each component easier to apply correctly.
Do smart money concepts work on markets other than forex?
Yes. The underlying mechanics of liquidity hunting and institutional order flow apply to any liquid market. Forex, indices, gold, crypto, and equities all exhibit the same SMC patterns because the same types of institutional participants operate across all of them.
What timeframes work best for smart money concepts?
Build your bias on the daily or 4-hour chart, identify your BSL and SSL levels and the ERL to IRL context, then drop to the 1-hour chart for entry confirmation via the CHoCH and fair value gap identification, and use the 15-minute chart for precise entry timing. Working top down ensures that your entries are aligned with the dominant institutional flow.
Conclusion
Smart money concepts give you a reason behind every move on the chart. Rather than reacting to candles after the fact, you read the market in terms of where institutions are positioned, what liquidity they need to collect, and where price is being delivered next. The building blocks are order flow, liquidity, order blocks, fair value gaps, and the ERL to IRL cycle. When you can apply all of these together and time your entries with the kill zones, you are trading in line with the same logic that drives price on every chart across every market.
The complete institutional trading guide at GhostTraders is where the full foundation is laid out. Every concept covered in this article has its own dedicated deep-dive that takes you further into practical application. For structured learning with live examples and guided exercises, the Institutional Trading Elite course covers the entire SMC methodology from bias to entry to management.
Risk Disclosure: Trading foreign exchange and financial derivatives carries a high level of risk and may not be suitable for all investors. All content on GhostTraders is for educational purposes only and does not constitute financial or investment advice. Never trade with money you cannot afford to lose. Author: Ndumiso Phelembe, Founder of GhostTraders, with over 10 years of experience in institutional trading methodology.
