

Breaker blocks form when smart money breaks through a previous swing high or low, trapping retail traders on the wrong side, and then retests that broken level before continuing in the new direction. The broken swing is no longer support or resistance in the traditional sense. It has flipped, and the retest of it is where you find the trade. That is the core logic of a breaker block: a structural level gets violated, and smart money uses the return to that level to execute the next leg of the move.
This article covers what breaker blocks are, how they differ from order blocks and mitigation blocks, how to identify them on a chart, and the full trading strategy from entry to target.
What Is a Breaker Block?
A breaker block is a previous swing high or low that price has broken through. Once broken, that former swing becomes a zone where institutional traders are likely to retest before continuing in the direction of the break. The logic behind it is straightforward: when smart money drives price through a swing point, it traps retail traders who were positioned at that level expecting it to hold. Those trapped traders fuel the continuation move as their stops get hit.
After the break, price typically pulls back to the breaker zone. This retest is where the trade forms. You are not chasing price. You are waiting for it to return to where the institutional move originated and entering alongside the same smart money that caused the break in the first place.
Breaker blocks reveal institutional intent. A clean break and retest tells you the direction smart money has committed to and gives you a defined zone to trade from with a clear stop placement.
How Breaker Blocks Differ from Order Blocks
Both concepts identify areas of institutional activity, but they form differently and serve different purposes in the trade plan.
An order block is the last opposing candle before an impulsive move. It is fresh institutional footprint where smart money first entered. Price has not yet returned to test it.
A breaker block is a swing high or low that has already been broken. The break itself is the signal that structure has shifted. The retest is the entry. As the order blocks guide explains, when an order block gets broken and violated, it converts into a breaker block. That is the exact transition point: a failed order block that gets run through becomes the new breaker zone.
| Feature | Order Block | Breaker Block |
|---|---|---|
| Formation | Last opposing candle before a strong directional move | Previous swing high or low broken by price |
| Visual ID | Specific candle at a swing point | Horizontal level at a violated swing high or low |
| Market context | Institutional footprint before a breakout | Broken structure acting as a retracement zone |
| Entry timing | Wait for price to return to the originating candle | Wait for price to retest the broken swing level |
| Reliability | Higher, clearer boundaries | Requires more context and confirmation |
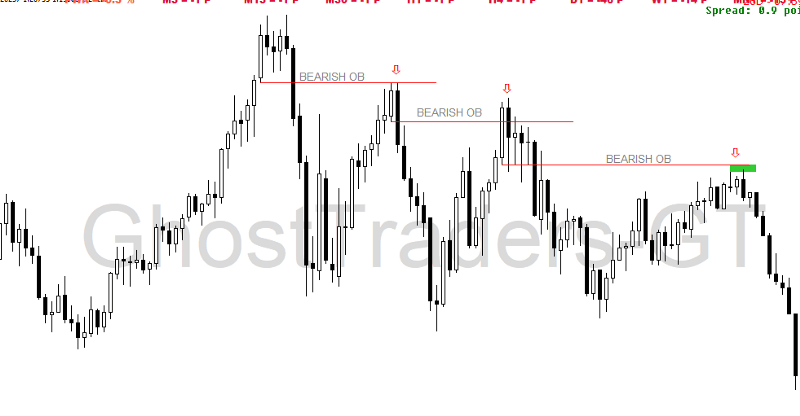
How Breaker Blocks Differ from Mitigation Blocks
This is where traders often get confused because both involve a retracement to a previous level. The difference is in what caused the setup.
A mitigation block forms because price failed to reach its liquidity target. An order block or rejection block stopped price before it collected the liquidity it was aiming for, creating a void that price must later return to fill. The previously violated high or low becomes the reference level for filling that void.
A breaker block forms because price successfully broke through a swing point. There was no failure. Smart money drove through the level, flipped it, and will now use the retest of that flipped level to continue the move.
In short: mitigation blocks are about filling voids from failed liquidity runs. Breaker blocks are about retesting structural flips from successful breaks. For the full mitigation block breakdown, the mitigation block guide covers both types in detail. For the framework combining both concepts with QML, the parent article covers all three together.
Key Characteristics of a Breaker Block
A shift in market structure must occur. A breaker block only forms after price has broken a previous swing high or swing low, confirming that order flow has changed direction or accelerated.
Liquidity trapping happens before the break. Before the structural break, price often makes a sharp spike above a previous high or below a previous low to collect the stop losses sitting there. That spike is the liquidity grab that fuels the break. Recognising this sequence helps you understand that the break is intentional, not accidental.
The retest confirms the flip. After the break, price returns to the broken level. If the break was genuine, price will reject from that level and continue in the direction of the break. That rejection is your entry signal.
Breaker blocks can signal reversals or continuations. A breaker at a major structural break signals a potential reversal of the existing trend. A breaker within an existing trend signals a continuation after a corrective pullback. The higher timeframe context determines which you are dealing with.
How to Identify Breaker Blocks: Step by Step
Step 1: Identify a Key Swing High or Low
Start by marking the significant swing highs and lows on your chart. These are the levels where previous moves began or ended. Focus on swings that have been tested at least once because they carry more liquidity above or below them.
Step 2: Watch for a Break of Structure
A breaker block only forms when price breaks through one of those swings. For a bearish breaker, price must break below a previous swing low. For a bullish breaker, price must break above a previous swing high. The break needs to be clean and decisive, not a small wick followed by an immediate reversal.
Step 3: Mark the Broken Swing as Your Breaker Zone
Once the break occurs, mark the high and low of the candle or small consolidation zone that formed at the swing point before the break. This is now your breaker block zone. For a bearish breaker, it was the support that became resistance. For a bullish breaker, it was the resistance that became support.
Step 4: Wait for the Retest
Price must return to the breaker zone after the break. This retest is what creates the trade opportunity. Do not enter on the break itself because you are chasing price and your stop placement will be wide. Wait for price to come back to the zone.
Step 5: Confirm the Rejection
When price reaches the breaker zone, drop to a lower timeframe and look for a market structure shift or a rejection candle confirming that the flipped level is holding. An engulfing candle, a pin bar, or a change of character on the 15-minute chart inside the zone is the confirmation you need before entering.
How to Trade Breaker Blocks: The Full Strategy
Establish Higher Timeframe Bias First
Breaker blocks are most reliable when they align with the dominant order flow. Before looking for breaker setups, confirm whether the higher timeframe is bullish or bearish. A bullish breaker block in a bearish order flow is a low-probability trade. A bullish breaker block in a bullish order flow is where the edge sits.
Advanced Strategy 1: Multi-Timeframe Confluence
Use the daily or 4-hour chart to identify the most significant breaker blocks. Use the 1-hour or 15-minute chart to time the entry when price returns to the zone. The higher timeframe gives you the structural context. The lower timeframe gives you the precision. When both timeframes agree on the direction and you are trading a breaker on the lower that aligns with the higher timeframe break, you have a high-confluence setup.
Advanced Strategy 2: Confluence with Fair Value Gaps and Liquidity Pools
The highest probability breaker block setups occur when the breaker zone coincides with a fair value gap from the break move. When price breaks structure and leaves an FVG in the same area as the broken swing level, the zone has two layers of institutional significance: the structural flip and the price imbalance. Price is more likely to react from a zone that combines both.
Similarly, if a liquidity pool such as equal highs or equal lows sits just beyond your breaker zone, be cautious. The algorithm may sweep that liquidity before the breaker holds. Wait for the sweep to complete first, then look for the rejection at the breaker.
Advanced Strategy 3: Session-Based Timing
Breaker blocks that form and get retested during the London open (2am to 5am EST) or the New York open (7am to 10am EST) are significantly more reliable than setups that form during low-volume periods. Institutional participation is highest during these windows. If a breaker forms outside these sessions, wait for the next kill zone to open before looking for the retest entry.
Entry, Stop Loss and Target
Entry: Set a limit order at the midpoint of the breaker zone. For a bearish breaker, that is 50% of the former swing high candle body. For a bullish breaker, that is 50% of the former swing low candle body.
Stop loss: Place your stop beyond the extreme of the breaker zone. For a bearish breaker, the stop goes above the high of the breaker zone. For a bullish breaker, the stop goes below the low of the breaker zone. Add a small buffer of 3 to 5 pips beyond the extreme to avoid being stopped out by minor wicks.
Target: Your primary target is the next significant liquidity level in the direction of the break. For a bearish breaker, that is the nearest sell side liquidity pool below. For a bullish breaker, that is the nearest buy side liquidity pool above. If a fair value gap sits between your entry and your target, factor in that price may pause to fill it on the way.
Common Mistakes to Avoid
Entering on the break rather than the retest is the most common and most costly mistake. The entry is at the retest, not the breakout. Chasing the break gives you a wide stop and a poor risk-to-reward ratio.
Ignoring the higher timeframe context leads to trading breakers that go against the dominant institutional flow. Even a clean, well-formed breaker is a low-probability trade if the higher timeframe order flow opposes it.
Treating every structural break as a breaker block is a mistake. Not every break produces a usable retest. A break with no accompanying fair value gap, no liquidity grab preceding it, and no confluence from the higher timeframe is a weak setup that should be passed on.
Entering before the rejection confirmation means entering on hope rather than evidence. Wait for the lower timeframe to show you that the zone is actually defending before committing capital to the trade.
Combining Breaker Blocks and Mitigation Blocks
In some market conditions, both concepts appear within the same structure. A breaker block signals the beginning of a new move or an acceleration of an existing one. A mitigation block forms within that move when price creates a void that must be filled before continuing. In that scenario, you can enter the initial directional bias using the breaker and then re-enter on the mitigation block pullback as the trend continues. This layered approach gives you two valid entries within the same institutional move while keeping your risk defined at each stage.
Frequently Asked Questions
How do I know if a breaker block will hold on the retest?
The strongest confirmation is a lower timeframe market structure shift inside the zone when price returns. If price enters the breaker zone, makes a small structure shift in the direction of the trade, and then moves away from the zone, that is the signal the zone is holding. Without that confirmation, the retest is unverified.
What is the difference between a breaker block and a change of character?
A change of character (CHoCH) is the first break of market structure that signals a potential shift in order flow. It is what precedes a breaker block. The CHoCH confirms the direction has changed. The subsequent break of the swing point that caused the CHoCH creates the breaker. The retest of that swing is where the breaker trade forms.
Can breaker blocks be traded on any timeframe?
Yes. The concept is timeframe-independent. However, higher timeframe breakers on the 4-hour and daily charts carry more institutional weight and produce more reliable retests. Lower timeframe breakers are useful for precision entries within a higher timeframe breaker setup.
What happens if price does not retest the breaker block?
If price breaks structure and continues aggressively without returning to the breaker zone, there is no trade. That happens when the institutional momentum behind the move is so strong that price is not drawn back before the next liquidity target is reached. In that case, look for the next breaker or mitigation block that forms within the continuation move.
Risk Disclosure: Trading foreign exchange and financial derivatives carries a high level of risk and may not be suitable for all investors. All content on GhostTraders is for educational purposes only and does not constitute financial or investment advice. Never trade with money you cannot afford to lose. Author: Ndumiso Phelembe, Founder of GhostTraders, with over 10 years of experience in institutional trading methodology
